briefing

Just Sharing healthy foods for little ones from 9mo~3yo++
blog started on 17/3/2015


Tuesday, January 19, 2016

19/1/2016 (Tue)無蛋免揉迷你奶酪麵包

My mobile phone set is still having problem and I couldn't edit my and upload photos through phone app. I tried removing the SD card and restarted the phone but it seems still very slow and reacted like a turtle. (sob...sob...)

Yesterday I was away from work and accompanied my 29.5mo gal visitted the HELLO KITTY GO AROUND in Viva Home Cheras with the complimentary tickets given by my sister in law. My gal was very happy, she was dancing while walking with super happy mood. She had french toast Roll with chicken floss for breakfast, stir fried noodle and radish soup for lunch and dinner. I couldn't take any photo as my phone was completely dead.

Breakfast: kneadless Bite size cheese buns and fresh milk
Lunch and Dinner: Fried Quinoa ramen and soup (dinner)
Teatime: Banana avocado milk and bun biscuits


Eggless knead-less mini cheese bun  
(Yield 36 mini buns)
Ingredients:
110g warm water
150g high protein flour
10g muscovado sugar or any sugar
pinch of sea salt
1/2 tsp instant dry yeast
5g rice bran olive oil

For Topping:
20g grated cheddar cheese (how to choose cheese for baby)

Steps:
1) mix all ingredients in a big bowl. Mix till combine and soft dough is formed (I spent less than 1 min)
2) cover bowl with cling wrap, leave a small hole for air flow.
3) keep in the fridge 2 hours onwards, after 2 hours, you may take out and shape any time.
4) take out the wet dough and place on a dusted mat.
5) put more flour to dust if too wet, press out all air and let it rest for 5 mins. Roll plat into 1cm height then cut into cubes. 
6) place the buns on the baking tray, put baking tray inside the oven (power off) and proof for 30mins. You may place a bowl of hot water inside the oven to help the proofing process better.
7) after 25mins, Remove the baking tray from the oven. sprinkle the grated cheese on each buns. Pre-heat the oven at 180'C for 5 mins.
8) Bake the buns for 15 mins or till light golden brown
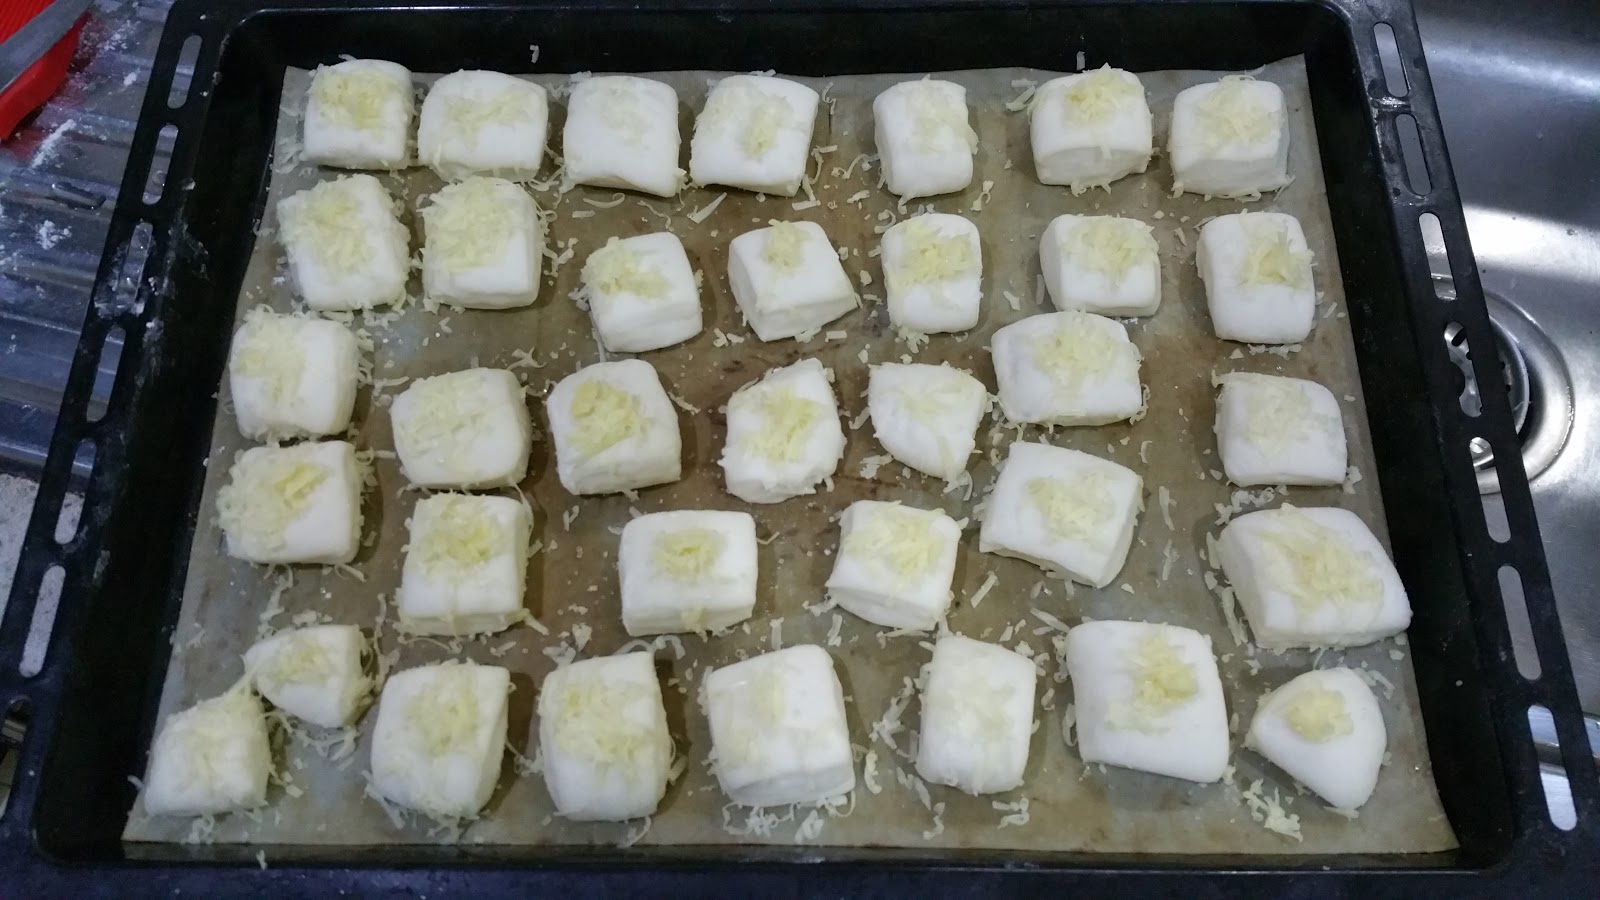

無蛋免揉迷你奶酪麵包
份量:約36個小麵包

材料:溫水110g,速發乾酵母1/2茶匙,高筋麵粉150g,細砂糖10克,鹽一咪咪,米糠油5g ,切達奶酪絲20g (如何選擇適合寶寶食用的奶酪

做法:

1. 將所有材料放入鋼盆內攪拌均勻
2. 放入樂扣盒中但不要蓋緊,讓空氣可進入
3. 放入冷藏兩小時到一天,隨時都可以拿出來整形(冷藏越久甜味越淡)
4. 將冰箱中的麵糰拿出來整型,麵糰很溼軟,可以多撒些麵粉。
5. 把麵糰裡的空氣擠壓出來,搓圓後用保鮮紙覆蓋,休麵糰5分鐘後才再整型。
6. 整形好直接放在烤盤上,並和一碗熱水一起送進沒開電源的烤箱裡發酵約30分鐘或至雙倍大。
7. 將發酵後的麵包攦上適量的乳酪絲。
8. 放入已經預熱至180度c的烤箱中,烘烤15分鐘或表面上色即可。


Stir Fried quinoa ramen with prawns and vegetables
Ingredients :
3 pcs of organic quinoa ramen
6 pcs medium prawns
1/3 bowl of cauliflower
1/2 stick celery
2 brussel sprouts
1/2 tsp liquid Amino
Dash of pepper powder
4 cloves garlic (sliced)
1/4 cup of soup stock / water

Steps:
1) cook noodle as per packaging instruction. 
2) heat pan with some olive oil and sauté garlic till fragrant
3) add in the following and stir fry, prawn and other vegetables
4) add some water to cover all ingredients and shimmer for 1 mins
5) add in the pre-cooked  noodle, add in liquid amino and pepper powder,  
6) off fire and ready to serve warm.


圈圈麵包餅
材料:
雞蛋1顆(淨重約45g),無鹽奶油15g,牛奶45cc,高筋麵粉30g,1茶匙蔗糖

做法:
1.高筋麵粉用濾網過篩備用。

2.將牛奶,糖和無鹽奶油放入鍋內,中小火煮至沸騰,轉小火。

3.將高筋麵粉倒入用木匙快速攪拌。

4.攪拌到麵粉完全成糰且不沾鍋子即關火。

5.麵團放至手摸不燙時,將蛋液分2次慢慢加入,每次都要攪拌均勻才可加的蛋液。

6.將麵糊裝進塑膠袋中剪一個小洞0.5mm,擠出圈圈的形狀或數字或任何喜歡的形狀,要保留間距。

7.放入預熱至160度C的烤箱中烘烤大约20鐘(中途转换烤盘方向)或边缘开始上色,立刻把电源关掉。用餘溫燜10分鐘即可取出。(我没有时间,让饼干在烤箱里面待了大概20分钟才出炉) 


Bun Biscuit Rings
Ingredients :
1 egg
30g high protein flour 
45g fresh milk or full cream milk or water
15g unsalted butter 
1 tsp muscovado sugar or any sugar or omit

Steps :
1) sieve flour and set aside 
2) cook milk, sugar and butter in a wok with low heat until boiling
3) add in flour and stir quickly with a spatula until dough is form and non stick
4) off fire and remove dough from the wok, let it cool down
5) when hand can touch on dough,  add in egg little by little, mix well then only add in more 
6) the dough turns into very wet dough, put the well mix batter into a plastic bag 
8) Pre heat oven at 160'C 
9) cut a 0.5 width hole at the edge of the plastic,  squeeze out the circles or any shapes or alphabets on the non stick baking sheet laid on the baking tray
10) bake for 20mins or till light golden brown, turning halfway, sit in the off oven for 10 mins or more.

Banana Avocado milk
Ingredients:
1/2 pc avocado
2 small bananas
1/4 cup fresh milk

Blend till smooth.....soooo yummy!

Saturday, January 16, 2016

自制蜜汁肉干(新年系列)updated recipe 19/1/2018

CNY is approaching and I am warming up to bake some CNY food for my family and little one... ^.^

自制蜜汁肉干
材料:
猪绞肉 (中嘴肉)650克
鱼露 1汤匙 
酱油 2汤匙
天然椰花糖 80克
蜜糖 2汤匙
绍兴酒 / 玫瑰露酒 1汤匙
胡椒粉 1/4茶匙
左口鱼粉 2茶匙
盐 一咪咪而已

刷面用:蜜糖 少许

做法:
1)
面包机:全部材料混合,tesco 面包机8号(20分钟) 搅拌至起胶质。
手作:把所有材料倒进一个大碗,用一双筷子往同一个方向打圈搅拌至起胶。

2)用保鲜膜盖好,置放冰箱至少3个小时或隔夜。
3)预热烤箱160度,把1/3 或1/2 的肉碎分量(请依照自己烤盘大小拿捏)倒入已经铺上不粘烤纸的烤盘。用汤匙压平,然后覆盖另一张不粘烤纸在肉碎上面,用擀面棍滚压成均匀的厚度。
4)取掉不粘烤纸,把烤盘送入烤箱中层,160度上下火烤15分钟。
5)把烤盘取出,温度提高至180度。在肉脯上面刷上薄薄一层蜜糖, 在烤箱中层继续烤10分钟。
6) 取出肉脯稍微待凉后剪成方形一片片,把每片肉脯翻面。把烤箱再次提高至200度,放在最高那层,继续烘烤5分钟即可。(请看守烤箱以免烤焦了~)

**左口鱼粉:味道像沙爹鱼那种香味,大的华人杂货店有卖。

**玫瑰露酒:很香的玫瑰香味,烘焙店有卖

Homemade Dried Meat / Pork Jerky / Bak Kwa
(Adult Version)
Ingredients:
650g fresh minced meat (I used shoulder loin 中嘴肉)
1 tbsp fish sauce
2 tbsp soy sauce
80g coconut flower sugar
2 tbsp honey
1 tbsp shaoxin wine / rose wine
1/4 tsp pepper powder
2 tsp flounger fish seasoning
pinch of salt

some honey to brush on surface

Steps:
1)
By Bradmaker: Put all ingredients in the breadmaker inner pot, select function no 8 "DOUGH" mode, on for 20 mins until the mixture becomes sticky and gluey.
By Hand: In a big bowl, add in all the ingredients. Stir the mixture with a pair of chopsticks in one direction only until it becomes sticky and gluey.
2) Cover with cling wrap and keep in the fridge for at least 3 hours or overnight.
3) Remove from fridge. Preheat oven to 160'C (upper and lower heat). Use a spoon, take out 1/2 or 1/3 of the meat mixture (depend on your baking tray size) onto the baking tray which laid with non-stick baking sheet. spread evenly then cover the meat mixture with another piece of non-stick baking sheet. Use a roller pin to roll it evenly and thinly.
4) remove the upper non-stick baking sheet, put in the middle rack and bake for 15 mins.
5) remove baking tray from the oven and increase the temperature to 180'C. Brush some honey evenly on the meat surface. put in the middle rack again and bake for 10 mins.
6) remove baking tray and cut the pork jerky into desired size then FLIP OVER them on the baking tray. Increase temperature to 200'C and place on the upper rack and bake for 5 mins. (Lastly 5 mins please monitor to avoid burnt)


Below is the dried meat recipe for TODDLERS~ ^.^


自制宝宝蜜汁肉干
材料:
猪绞肉 (中嘴肉)300克
天然酱油 2汤匙
天然椰花糖 10克
蜜糖 4汤匙
绍兴酒 / 玫瑰露酒 1茶匙
胡椒粉 1/8茶匙

刷面用:蜜糖 少许


做法:
1)
面包机:全部材料混合,tesco 面包机8号(20分钟) 搅拌至起胶质。
手作:把所有材料倒进一个大碗,用一双筷子往同一个方向打圈搅拌至起胶。

2)用保鲜膜盖好,置放冰箱至少3个小时或隔夜。
3)预热烤箱160度,把1/3 或1/2 的肉碎分量(请依照自己烤盘大小拿捏)倒入已经铺上不粘烤纸的烤盘。用汤匙压平,然后覆盖另一张不粘烤纸在肉碎上面,用擀面棍滚压成均匀的厚度。
4)取掉不粘烤纸,把烤盘送入烤箱中层,160度上下火烤15分钟。
5)把烤盘取出,温度提高至180度。在肉脯上面刷上薄薄一层蜜糖, 在烤箱中层继续烤10分钟。
6) 取出肉脯稍微待凉后剪成方形一片片,把每片肉脯翻面。把烤箱再次提高至200度,放在最高那层,继续烘烤5分钟即可。(请看守烤箱以免烤焦了~)

Homemade Dried Meat / Pork Jerky / Bak Kwa
(BABY Version)
Ingredients:
300g fresh minced meat (I used shoulder loin 中嘴肉)
2 tbsp liquid amino
10g coconut flower sugar
4 tbsp honey
1 tsp shaoxin wine / rose wine
1/8 tsp pepper powder

some honey to brush on surface

Steps:
1)
By Bradmaker: Put all ingredients in the breadmaker inner pot, select function no 8 "DOUGH" mode, on for 20 mins until the mixture becomes sticky and gluey.
By Hand: In a big bowl, add in all the ingredients. Stir the mixture with a pair of chopsticks in one direction only until it becomes sticky and gluey.
2) Cover with cling wrap and keep in the fridge for at least 3 hours or overnight.
3) Remove from fridge. Preheat oven to 160'C (upper and lower heat). Use a spoon, take out 1/2 or 1/3 of the meat mixture (depend on your baking tray size) onto the baking tray which laid with non-stick baking sheet. spread evenly then cover the meat mixture with another piece of non-stick baking sheet. Use a roller pin to roll it evenly and thinly.
4) remove the upper non-stick baking sheet, put in the middle rack and bake for 15 mins.
5) remove baking tray from the oven and increase the temperature to 180'C. Brush some honey evenly on the meat surface. put in the middle rack again and bake for 10 mins.
6) remove baking tray and cut the pork jerky into desired size then FLIP OVER them on the baking tray. Increase temperature to 200'C and place on the upper rack and bake for 5 mins. (Lastly 5 mins please monitor to avoid burnt)

*****************************************************************
I use Coconut sugar just because Coconut sugar had a lower glycemic index, a measure of how quickly a food raises your blood sugar levels, on every one of those seven samples. Researchers here determined coconut sugar had a glycemic index of about 35, officially ranking it a low-glycemic sweetener.


Friday, January 15, 2016

15/1/2016 Happy Friday 斑馬紋優格蛋糕

Since last 2 days, my phone is still having problem in restarting itself and hang terribly, slow reaction, and my photos couldn't be synchronized to my pc. The phone only be used for 1 year only, I don't have budget to change my phone so often...please be good again....

This morning I was baking Meat Jerky (Dried Meat) for testing only. For 500g minced meat, how many grams dried meat I can get.

Breakfast: Zebra Yogurt cake and fresh milk
Lunch and Dinner: 3C Quinoa ramen serve with onion seaweed egg roll and tomato chicken soup
Teatime: Honeydew Yogurt  


Zebra Yogurt Cake
Makes 6″ round cake pan 
Ingredients:
(A) 
3 egg yolks
10g cane sugar
25g rice bran oil
 90g natural plain yogurt
55g cake flour/low protein flour/superfine flour

(B) 
2 tsp bamboo charcoal powder
1 tbsp cake flour
1 tbsp fresh milk

(C)
3 egg whites
20g organic cane sugar
few drops vinegar

Steps:
1) Mix all ingredients in (A) follow by sequence : egg yolk + sugar, yogurt + oil, sieve in flour, mix well
2) Mix well ingredients in (B)
3) Make the meringue by whisking egg whites with sugar and whisk until hard peaks form. 
4) Take 1/3 meringue and fold into the (A), After incorporated, pour the batter back to the remaining 2/3 meringue and fold. FOLD GENTLY. Pour 1/3 of the mixture in (B) and mix well.
5) Drop approximately 1/3 cup of plain batter into the centre of prepared pan, allowing it to spread. Drop 1/3 cup of black batter into the centre of plain batter and allow it to spread. Continue alternating using 1/4 cup of batter at a time, until batter is done.
5) Bake the cake in a water bath for 1 hours or until set and golden brown at 160'C.
6) remove cake from oven immediately, after 1-2 mins the cake can be easily removed from the mould. cool down and store in the fridge at least 2 hours.


斑馬紋優格蛋糕

材料A: 蛋黃3個糖10g 米糠油25g 原味優格90g 低筋麵粉55g

材料B: 竹碳粉2茶匙牛奶1 湯匙低筋麵粉1 湯匙

材料C: 蛋白3個糖20g 白米醋/檸檬汁幾滴

做法:

1. 材料A的蛋黃及糖先打勻。接著加入優格及米糠油拌勻。再加入過篩的麵粉拌勻備用。
2. 材料B的竹碳粉、牛奶及糖拌勻。拌勻成為黑色液體備用。
3. 材料C的蛋白先打出一些泡沫,然後加入檸檬汁及糖(分2次加入)打至乾性發泡。
4. 把打發的蛋白分两次或三次加入優格蛋黃麵糊中輕拌均勻。最後一次將優格蛋黃麵糊倒入蛋白霜中拌勻。取約1/3拌好的麵糊加入(做法2)。輕拌均勻成為黑色的麵糊。
5.預熱烤箱160度C。 6吋圓模底部鋪紙。在烤模中間倒入1/3杯白色麵糊,讓它自然流。在白色麵糊上面,再倒入1/3杯黑色麵糊。依次交替倒完所有麵糊。
6. 把蛋糕模放在裝足夠熱水的烤盤上。用160度C烤60分鐘。

(隔水蒸烤最好加熱水,水量要加夠,不要烤到一半水份就蒸發光了,水太快乾也會影響成品。)
烤好取出,兩分鐘後晃一晃,蛋糕就很容易脫模的。然後放入冰箱冰至少2個小時,就可切塊享用了。

Thursday, January 14, 2016

14/1/2016 (Thu)

There is nothing special for today's food and I am lazy to type out the recipe since mostly can be found in my previous post and very simple meals.
Please pardon my laziness today.. (;P)

By the way, I was busying baking CNY cookies starting last 2 night. Tonight I am going to test baking Meat Jerky as this is a must snack during CNY. 

Last night hubby brought a piece of Japanese soft cake with custard filling for me. It was so yummy and hubby wants me to bake for him.... (sweating**).... gonna try out 1 day for him and for my gal too.

Breakfast: Steamed Edamame, Pear, hard boiled egg and fresh milk
Lunch and Dinner: Pine nut shimeiji Rice, steamed minced meat egg and radish soup
Teatime: Pear Barley Drink and Almond cookies