briefing

Just Sharing healthy foods for little ones from 9mo~3yo++
blog started on 17/3/2015


Showing posts with label yogurt melts. Show all posts

Tuesday, June 21, 2016

21/6/2016 (Tue)北海道起司撻


Happy Tuesday! Tomorrow is public holiday,enjoy your day too!
快樂星期天二!明天是公共假期,可以一家人開心度假了!

Breakfast: baked Hokkaido Cheese Tarts and fresh milk
Lunch and dinner: Brown rice with orange baked chicken wings and garden pea soup
Teatime: fresh orange and mango passion fruit yogurt melts

Bake Hokkaido Cheese Tart
(yield 9 tarts, using 5.5cm top/3cm base tart mold)

Ingredients:
(A) Tart pastry
100g cake flour
15g icing sugar
40g unsalted butter, cut into cubes, cold
1 egg yolk
1 tbsp fresh milk

(B) Cheese custard
130g cream cheese
20g grated cheddar cheese
25g unsalted butter
80g whipping cream / fresh milk
15g organic cane sugar
6g corn starch + 2 tbsp fresh milk / water (mix well)
1 egg (1 egg white+ 1/2 egg yolk)
1 tbsp lemon juice
1 tsp vanilla extract
pinch of sea salt

(C) Brushing
1/2 egg yolk for brushing on top of custard

Steps:
1) mix shifted flour and icing sugar with butter. Use hand to rub until it resembles like bread crumbs.
2) add in egg yolk, continue mix by hand
3) add in milk and gently knead to form a soft dough. The dough shall not be sticky. wrap dough in cling wrap and keep inside fridge to rest for 1 hour.

***While waiting, prepare the cheese custard*** 

4) Add cream cheese, cheddar cheese, whipping cream/fresh milk and butter into a small pot. Place the pot into a large, shallow pan/pot with barely simmering water. Keep stirring the mixture till all dissolved.
5) remove small pot from the heat, mix well the corn starch and water then pour in the cheese mixture, stir well.
6) add in sugar, egg (1 egg white + 1/2 egg yolk), vanilla extract, sea salt and lemon juice. Mix till well-blended, return to the heat.
7) keep stirring the mixture and it will thicken into custard. Taste the custard and if desired. (add sugar / salt if you like heavier taste) Off fire and let the custard cool down completely.


***Back to the tart pastry*** 

8) Remove the dough from fridge. Place a sheet of cling wrap on the table. place the dough on the cling wrap and cover by another sheet of cling wrap. Roll the dough thinly, about 3-4 mm thickness. 9) Use a 7cm fluted cutter to stamp the dough. Place the cut dough over a tart mold and gently press it downwards and surrounding the sides with fingers. Use a fork to poke holes at the base of the tart cases.
10) Bake the tart shells at 180C, fan mode for 10mins. Remove from oven and place on wire rack to cool. After the tart shells are slightly cool down, remove them from the molds and let cool completely before use.
11) Preheat oven to 230C fan mode.
12) transfer custard into piping bag and pipe the custard into the tart shells, shape slightly domed. Brush custard evenly with egg yolk.
13) Bake the tarts at 230C fan mode, for 6-7 mins.
14) Once baked, remove from oven and place on wire rack to cool. Best eaten warm, freshly baked.

♡♡♡ Tips ♡♡♡
○ over kneading dough will resulted hard crust.
○ to remove tart mold immediately to to avoid tart shell getting moisture on the bottom.

○ brush egg yolk twice to have nicer color.

北海道起司撻
撻皮材料 :
低筋麵粉 100克
糖粉 15克
冷無鹽奶油 40克 (切小顆粒)
蛋黃 1粒
鮮奶 1湯匙

乳酪餡材料 :
奶油乳酪 130克
切達乳酪芝士 25克
動物性鮮奶油 / 鮮奶 80克
有機蔗糖/幼糖 15克
香草香精 1茶匙
玉米粉/粟粉 6克 + 鮮奶/水 2湯匙
蛋白 1粒
蛋黃 1/2粒

表層塗料 :
蛋黃 1/2粒 (打散)

做法 :
(1) 把低筋麵粉和糖粉篩入大盆裡, 加入切顆粒的無鹽奶油, 用手搓至粉糠狀。
(2) 加入蛋黃和鮮奶, 搓至成軟團。
(3) 用保鮮膜把軟團包裹,收進冰箱休麵團1個小時。

***等待時可以準備起司餡***

 (4) 把鮮奶/鮮奶油, 奶油起司, 車達起司, 香草香精和無鹽奶油一起放進一個小鍋裡, 然後把小鍋放入一個裝著熱水的大鍋,隔水加熱,不停攪拌至溶解。
(5) 把小鍋取出,加入拌勻的玉米粉和水,攪拌均勻。
(6) 接著依序加入糖,雞蛋( 1個雞蛋白+ 1/2蛋黃) ,香草精,海鹽,檸檬汁,攪拌均勻。再放回熱水中,開小火繼續攪拌至出現微許的紋路。可以試試味道,如果你喜歡的味道比較重的話,可以多加一些糖/鹽。然後關火待冷即可。

***回到撻皮的部分***

(7) 從冰箱中取出麵團。舖一張保鮮膜在案板上,把麵團放在上面,再覆蓋另一張保鮮膜。用擀麵棍把麵團擀成約3-4毫米的厚度。
(8) 用撻模或7厘米的圓餅模割出小麵團圓餅。用拇指沿底部開始推上邊緣,平均按壓成撻殼。然後用叉子在撻殼底部插些小孔。
(9) 放入已預熱180℃的烤箱,烘烤大約 10 至 12分鐘,見邊緣稍微上色即可取出,把撻殼放在鐵架上放涼。略有降溫時把模具取出,冷卻待用。
(10) 烤箱預熱至230℃,上下火,風扇模式。
(11) 起司餡裝進擠花袋,用大號的圓形花嘴(沒有就直接剪個口吧)擠進烤好完全冷卻的撻皮,擠成外形略帶圓狀的。用毛刷把蛋黃液均勻地塗刷在起司餡上面。
(12) 放入烤箱中層,烘烤大約 5分鐘,然後轉移烤盤至最上層繼續烘烤2-3分鐘即可。
(13) 出爐後,放在鐵架上放涼,溫暖的起司撻最美味!

♡♡♡溫馨提示♡♡♡
○撻皮切忌搓揉過度, 避免起筋。
○ 烤好的撻皮得立即脫模, 以免底部產生濕氣。
○ 蛋黃液塗抹兩次, 色澤會更加好看。


橙香蜂蜜烤雞翅【烤箱料理】
材料:
雞翅膀 2只
蜂蜜 1茶匙
天然醬油 2-3滴
胡椒粉 適量
柳橙汁 1/2顆
乾香菜 適量

做法:
1)將洗淨的雞翅放入碗裡,倒入蜂蜜、醬油、乾​​香菜、胡椒粉,並擠入柳橙汁。用手抓均勻每隻雞翅都有附著醬汁後,放冰箱醃製30分鐘以上。
2)烤箱以200度預熱,同時用一張烤紙,折成淺碗,用訂書機固定形狀。
3)將醃好的雞翅擺在烤紙上,並淋上醃料的醬汁。
4)以200度烤20分鐘或至上色。
5)底下可放柳橙片做擺盤,看起來真的色香味俱全!

Orange Baked chicken wings
Ingrediants:
2 pcs Chicken Wings 
1 tsp honey
2-3 drops Liquid Amino
dash of Pepper powder
dash of dried Parsley
1/2 Orange juice/puree  

Steps:
1 ) Clean chicken wings then put in a bowl, pour in the honey, liquid amino/soy sauce, dried parsley, pepper powder and squeeze in orange juice. Mix all ingredients and chicken wings well. Marinate it in the fridge at least 30 minutes.
2 ) Preheat oven to 200 degrees, at the same time, cut a piece of baking paper, folded into a shallow bowl shape and fix the shape by a stapler.
3 ) place the chicken wings in the paper bowl and pour in the marinated sauce together.
4 ) bake for 20 minutes or till golden brown at edges.
5 ) place some orange slices for decorations, ready to serve!


Please click the below link for recipe
食谱请按以下连接

You may use plain yogurt or any flavored 


Wednesday, April 27, 2016

26/4/2016 (Tue) 優格酸奶溶豆

Breakfast: pan cooked bun with peanut butter filling and fresh milk
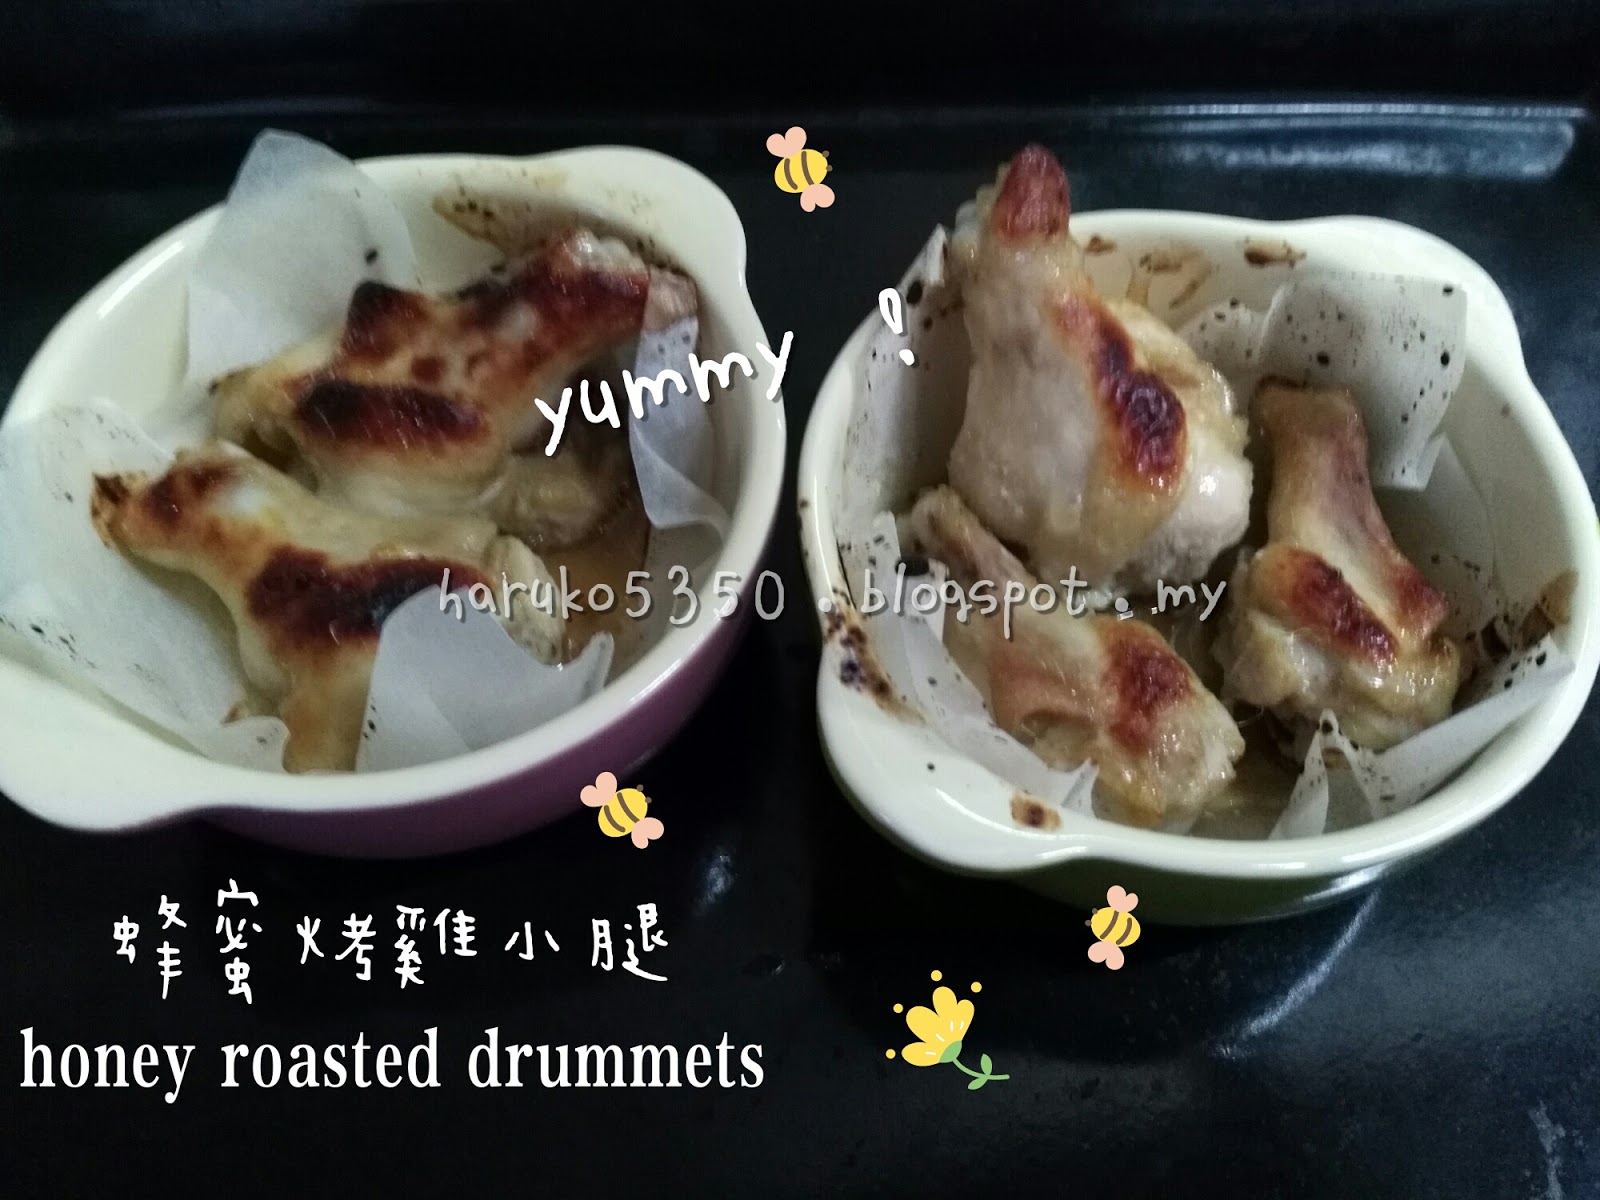
Lunch and dinner: udon with honey roasted drummets and kunbu onion soup
Teatime: yogurt melts and steamed onion juice


Pan Cook Bun/bread
(original recipe by 小龍媽 from Taiwan)
Ingredients: (yield 6 mini buns)
50g All purpose Flour
1g (1/4 tsp) Instant Dry Yeast
30-35ml Fresh Milk/fullcream milk/formula milk
3g olive oil/grapeseed oil/rice bran oil/any vege oil
3g sugar
some black sesame / chiaseed (optional)

Filling:
ANY FILINGS....Kaya...Jam...Butter Jam...cream cheese sauce....custard....and many more~

Steps:
1) in a mixing bowl, add in all ingredients except cheese
2) mix and knead till hand is clean, bowl is clean and dough is smooth.
3) cover dough with clean damp cloth, rest for 10-15mins
4) divide dough into 6 equally portions, wrap in filling in each dough
5) roll and flatten the dough。

Pan cook method:
a) place buns in a non stick pan (no oil needed), close lid and proof for 20-30mins.
b) pan cook with smallest fire for 5-8 mins.
c) over turn the bread and pan cook till both sides golden brown.

Oven method:
a) place buns on baking tray laid with parchment paper, proof for 20-30mins inside off oven.
b) remove baking tray from the oven, preheat oven till 150'C.
b) bake at preheated oven of 150'C for 10 mins.
p/s: for nicer outlook, just simply pan fry without oil both sides golden brown.


平底鍋烤麵包(香煎包)
(原食谱:小龍媽)
材料:(6小粒麵包)
【麵皮】
中筋麵粉50g
酵母1g (1/4茶匙)
鲜奶/全脂奶/配方奶(奶粉+水) 30-35g
橄欖油/任何植物油3g
糖3g
黑芝麻/奇亞籽(可省略)

【內餡】
任何果醬,加央,卡士達醬,等等。 。

作法:
1.粉類過篩。
2.除了起司片以外,所有的材料全部拌勻,拌至無粉的狀態即可。
3.蓋上擰乾的濕布醒麵10-15分鐘。
4.取出麵糰放在撒上麵粉的揉麵板上。
5.分成6等分,桿平並放上餡料,收口處緊密捏合。

平底鍋版:
a)放入平底不沾鍋不需抹油,發酵20-25分鐘。。
b)蓋上鍋蓋用最小火烘烤5-8分鐘。
c)兩面均烤至上色即可起鍋盛盤。

烤箱版:
a)把麵包排放到烤盤上,送進沒有開電源的烤箱裡發酵20-25分鐘。
b)把烤盤取出,開始預熱烤箱150度。烘烤約10分鐘即可。
備註:如果想要煎包上色美觀,可以用不沾鍋幹煎至兩面上色就可以了。

Honey Baked drummets
Ingredient:
5pcs  chicken drummets ( i use kee song brand)
2 gloves garlic (crushed)
1/4 tsp liquid amino
dash of pepper powder
some garlic powder
1 tbsp fresh milk
some honey

Steps:
1) Marinate the drumstick with all the ingredients for 30mins or more or overnight
2) Preheat oven to 190 degrees C.
3) Place chicken drumstick on a plate then place on the baking tray and brush some honey on the surface.
4) Bake for 20 minutes 

蜂蜜烤雞小腿
材料:
5只其祥小雞腿
1/4 茶匙天然醬油(我用液體氨基)
胡椒粉 適量
蒜粉 適量
一些 蒜泥
牛奶 1湯匙
蜂蜜 適量

做法:
1)把蒜泥和雞腿一起放入一個碟子裡,倒入醬油,蜂蜜,胡椒粉,蒜粉和牛奶,放入冰箱冷藏室醃約30分鐘或隔天再烤也可以
2 )烤箱預熱至190 ℃。
3 )然後把雞腿放在烤盤上,表面再塗一些蜂蜜。
4)烘烤20分鐘。


優格酸奶溶豆
材料:
原味優格 45克
嬰兒奶粉 38克 (如果没有,全脂奶粉/玉米粉代替)
玉米澱粉 25克
蛋白 2粒 (73-75g)
細砂糖 10-15克 (我用10克而已)
檸檬汁 幾滴(加蛋白中去腥和稳定蛋白泡泡)

做法:
  
1. 稱出適量優格 ,把奶粉與玉米澱粉過篩後與優格攪拌均勻後備用。奶粉為無糖的嬰兒配方奶粉。

2. 蛋白在無水、無油清潔的容器中打發,當魚眼泡時加入細砂糖,打發至硬性發泡。很硬那種,拉出攪頭很短的尖那種。

3. 將優格糊與蛋白糊混合翻拌後,不需要過度攪拌,快手操作,提前預熱烤箱,我用100度左右就可以,記得鋪上矽膠墊哦!強烈推薦,以前我用烤紙,這幾次用的矽膠墊超級給力,裝入裱花袋中可用圓嘴或者我這種中號六齒擠出小饅頭或者小塔糖的形狀!

4.因為給寶寶吃就不要擠很大,小小顆很適合寶寶,所以就這個量,你可能也會擠兩盤以上,我是兩盤一起烤的,低溫烘烤用了60分鐘,中間有上下倒換一下烤盤,原則是不上色好看!

5.最後也可關閉烤箱,不拿出烤盤在裡面悶烤一下,當你的溶豆不容易從烘培紙上取下的時候,就是沒有烘烤透,需要延長時間。烤好後要密封儲存!此款小食不會很甜,很適合寶寶,入口即溶!

*小貼士*

1. 請根據自家烤箱溫度做調整,我的烤箱比較大,小烤箱的火力比較猛。要看著一下,以免糊掉。

2.不成形請根據以下兩點找原因:要么酸奶太稀,水分太多,要么攪拌過度消泡了!

3.從烤紙上取不下來要么烘焙時間不夠,還是軟的,要么烤過了,已經糊了!


step 1 - mixing yogurt, milk powder and corn starch


step 2 - 7 : beating egg white, squeezing out batter


Plain Yogurt Melts
Ingredients
45g Natural Greek Yogurt (or using flavoured yogurt)
38g milk powder / baby formula milk powder
25g corn starch
2 large egg white
10-15g castor sugar (I used 10g only)
1/2 tsp lemon juice or vinegar

Steps:
1) add milk powder and corn starch into the yogurt
2) add the lemon juice into egg white, beat the egg white with sugar till hard peak form
3) add 1/3 of the egg white into the yogurt mixture, mix well
4) add the yogurt mixture into the 2/3 of the egg white and fold well gently but quickly.
5) preheat oven at 120'C
6) put the mixture in a piping bag or plastic bag, cut a 0.7cm hole at the edge
7) Squeeze out mixture onto baking tray laid with non stick parchment paper
8) Bake at 100'C for 60mins or till the cookies easily be removed from the parchment paper
9) let the cookies sit in the oven for further 10-30mins is recommended.


Just follow the above recipe by using 6 onions instead.
只需依照以上的做法, 用了6粒大洋蔥。

Tuesday, March 1, 2016

1/3/2016 (Tue) 平底鍋草莓蛋糕


平底鍋草莓蛋糕
材料:
【蛋黃麵糊】
低筋麵粉40g
蛋黃2顆
草莓泥30g
橄欖油5g

【蛋白霜】
蛋白2顆
有機蔗糖8-10g (我放8克)

作法:
1.把蛋黃麵糊的材料全部加在一起拌勻備用。
2.蛋白加入糖打到濕性發泡(拉出的蛋白好像鳥嘴般的)。
3.把蛋白霜分2-3次加入蛋黃麵糊,以切入方式輕輕攪拌均勻。
4.平底鍋鋪上不沾烤布/紙並倒入拌好的麵糊,稍微抹平表面。
5.把鍋蓋蓋上,用最最小的火烘烤大約10分鐘,使用牙籤 插入蛋糕中央,拔出時牙籤不會沾附濕黏的麵粉亦表示已熟透。

備註:打開時小心鍋蓋蒸汽的水不要滴到蛋糕。

Strawberry cake (pan cook)
Ingredients:
[ Yolk batter ]
40g cake flour/ Low protein flour
2 egg yolks
30g Strawberry puree
5g Olive oil

[ Meringue ]
2 egg whites
8-10g Organic Cane Sugar ( I used 8g )

Steps:
1) In a mixing bowl, add in egg yolk, oil and strawberry puree, mix well then add in flour and mix till combined. Set aside.
2) Place the egg whites into a clean bowl and whisk till bubbly then add in sugar by 2 portions. Continue whisking until soft peaks form, approximately 2 minutes.
3) Transfer 1/3 of the egg whites to the egg yolk batter and mix well. Add the remaining egg whites and fold in gently. 
4) Lay a non stick baking sheet / paper in a non stick pan, then pour in the batter.
5) Cover the pan with lid, bake under smallest fire for about 10 minutes, test by inserting a wooden stick and pull out clean.

P/S : Be careful when you open the lid to avoid water dripping onto the cake.


蛋糕切片後,也可以抹上果醬一起享用。

午餐:海底動物面

午餐:番茄白玉菇湯

食譜請按以上連接
For Recipe, please click the above link

Thursday, February 4, 2016

4/2/2016 (Thu) 芒果百香果優格溶豆


蕃薯蔴辮
材料:蕃薯泥100克,木薯粉25克。
做法:
1)兩樣材料搓成團,分成6-8份。
2)每份搓成長條,對折扭轉成蔴辮。
3)熱鍋加油,煎至上色即可。

也可以用烤箱,160‘C度,15分鐘。


ABC Pasta with ABC Soup
Ingredients: 
Alphabets Pasta or any types of desired pasta, cook as per instructions 

My way of cooking to avoid mushy and soggy pasta and can last till dinner:~
1) I cook pasta as per instruction on packaging, 
2) drain away the hot water
3) soak pasta in a big bowl of ICE cold water for 30 seconds
4) drain away the cold water
5) add 1-2 tsp rice bran oil or olive oil to the pasta and mix well

for reheating:~
1) Just scoop out the pasta portion, steam for 5 mins.
2) Pour in the heated ABC Soup
3) Ready to serve~ 

ABC Soup
Ingredients :
1 chicken tight (ayam kampung)
1/2 carrot
1 potato
1 onion
1.5 litre water

Steps:
1) blanch the chicken tights in boiling water for 3-5 minutes
2) cut the carrot, potato and onion into small pieces.
3) Cook all ingredients in a big pot of water in high fire for 10 mins, then 2 hours in small fire.


芒果百香果優格溶豆
材料:
芒果百香果優格 60克 (也可以用任何口味的全脂優格)
嬰兒奶粉 40克 (如果沒有,全脂奶粉/玉米粉代替)
玉米粉 30克
蛋清/蛋白 100克 (3粒蛋)
細砂糖 5克 (如果用原味優格,糖可以用10克
白米醋/檸檬汁 幾滴(加蛋白中去腥和穩定蛋白泡泡)

做法:
1. 稱出適量優格 ,把奶粉和玉米粉與優格攪拌均勻後備用。

2. 蛋清在無水、無油清潔的容器中打發,當魚眼泡時加入細砂糖,打發至硬性發泡。很硬那種,拉出攪頭很短的尖那種。

3. 將優格糊與蛋白糊混合翻拌後,不需要過度攪拌,快手操作,提前預熱烤箱,我用100度左右就可以,記得鋪上矽膠墊哦!強烈推薦,以前我用烤紙,這幾次用的矽膠墊超級給力,裝入裱花袋中可用圓嘴或者我這種中號六齒擠出小饅頭或者小塔糖的形狀!

4.因為給寶寶吃就不要擠很大,小小顆很適合寶寶,所以就這個量,你可能也會擠兩盤以上,我是兩盤一起烤的,低溫烘烤用了60分鐘,中間有上下倒換一下烤盤,原則是不上色好看!

5.最後也可關閉烤箱,不拿出烤盤在裡面悶烤一下,當你的溶豆不容易從烘培紙上取下的時候,就是沒有烘烤透,需要延長時間。烤好後要密封儲存!此款小食不會很甜,很適合寶寶,入口即溶!

*小貼士*

1. 請根據自家烤箱溫度做調整,我的烤箱比較大,小烤箱的火力比較猛。要看著一下,以免糊掉。

2.不成形請根據以下兩點找原因:要么酸奶太稀,水分太多,要么攪拌過度消泡了!

3.從烤紙上取不下來要么烘焙時間不夠,還是軟的,要么烤過了,已經糊了!


video of making yogurt melts


Mango Passion Fruit Yogurt Melts
Ingredients
60g Full fat Mango Passion Fruit Yogurt (or using flavoured yogurt)
40g milk powder / baby formula milk powder
30g corn starch
100g egg white
5g castor sugar (If using plain yogurt, used 10g)
1/2 tsp lemon juice or vinegar

Steps:
1) Add milk powder and corn starch into the yogurt
2) add the lemon juice into egg white, beat the egg white with sugar till hard peak form
3) add 1/3 of the egg white into the yogurt mixture, mix well
4) add the yogurt mixture into the 2/3 of the egg white and fold well gently but quickly.
5) preheat oven at 120'C
6) put the mixture in a piping bag or plastic bag, cut a 0.7cm hole at the edge
7) Squeeze out mixture onto baking tray laid with non stick parchment paper
8) Bake at 100'C for 60mins or till the cookies easily be removed from the parchment paper
9) let the cookies sit in the oven for further 5-10mins is recommended.


Tuesday, September 22, 2015

22/9/15 Tuesday 番薯雞丁球

Last night I spent 2 hours driving home as it was very traffic jam after heavy rain pour. I checked with MIL about the foods taking by my lo and happy that she finished 90% of her breakfast, lunch and teatime. After quick dinner, I baked some nuts moon cakes for my MIL as it is her favourite moon cake. In the meantime, hubby was spending time with my lo and she keep coming to the dinning table to search for snacks....  @@ Finally gave her the last few pieces of onion rings to satisfy her tummy... haha..

Breakfast: sweet potato chicken balls, apple and fresh milk
Lunch: Macaroni and Cheese
Teatime: Yogurt Melts and young coconut

Sweet Potato Chicken Nest Balls
Ingredients:
100g cooked sweet potato
15g cheddar cheese
40g potato starch
40-50g chicken breast
1 slice apple

Steps:
1) cook 1 sweet potato in boiling water till tender (fork can be easily poked in)
2) dice the chicken breast into 1cm3 size, shred the apple and mix with chicken, marinate, set aside
3) peel and weight 100g cooked sweet potato, shred in the cheddar cheese while still hot, mix well
4) add potato starch into mashed sweet potato, mix and form soft dough
5) pan fry the chicken in a non stick pan, with or without oil ( i didn't put oil), pan fry for 1-2 mins, scoop out 
6) divide dough into 20 portions (depends how many chicken cubes you have), roll each portion into long stick, place a chicken cube on one end of the stick, wrap and roll the chicken cube free style as photos below. place each balls on the parchment paper laid on the baking tray.
7) bake at preheated oven of 180'C for 10-15mins

p/s: taste yummy with the natural sweetness from sweet potato

番薯雞丁球
材料:
100克煮熟的番薯
15克切達奶酪
40克太白粉/馬鈴薯澱粉
40-50雞胸肉
1片蘋果

做法:
1 )把1條番薯連皮放進沸水中煮至軟。 (叉子可以輕鬆地戳入就可以了)
2 )把雞胸肉切成1立方厘米大小,加入刨碎的蘋果裡拌勻醃製,待用。
3 )把煮熟的番薯剝皮並稱出100的重量,趁熱拌入切碎的切達乾酪,拌勻。
4 )然後把太白粉加入番薯泥,混合揉成軟麵團。
5 )另一邊,把雞丁放入平底鍋內炒熟,(可放油或不放。我沒放油) ,炒1-2分鐘,舀出。
6 )把麵團分成20個小麵團(取決於你有多少粒雞丁) 。把小麵團搓成條狀,放一顆雞丁在薯條的一端,隨意地捲成如照片的形狀。將每個番薯雞丁球放在鋪有防沾黏紙的烤盤上。
7 )送進預熱好的烤箱180'C烤10-15分鐘。

chicken breast: dice, marinate, cook
鸡胸肉:切丁,腌制,煮


sweet potato: cook, mash, dough, stick, wrap and roll
番薯:煮,成糊状,成团,搓条状,卷鸡丁
Macaroni and Cheese
Ingredients:
1 bowl cooked macaroni
1/2 cup full cream milk
20g cheddar cheese
30g chicken meat (marinated in shredded apple)
1 shallot
dash of pepper powder

Steps:
1) heat pan and saute shallot till fragrant.
2) add in chicken and stir fry till light golden brown
3) add in macaroni, milk and 10g cheese, dash of pepper powder, stir fry a while and off fire.
4) transfer macaroni into 2 ramekin bowls, shred the remaining cheese on top.
5) bake at preheated oven of 180'C for 10 mins.


優格酸奶溶豆
材料:
原味優格 30克
嬰兒奶粉 25克 (如果没有,全脂奶粉/玉米粉代替)
玉米澱粉 12克
蛋清 50g
細砂糖 10克 (我加7克而已)
檸檬汁 幾滴(加蛋白中去腥和稳定蛋白泡泡)

做法:
  
1. 稱出適量優格 ,把奶粉與玉米澱粉過篩後與優格攪拌均勻後備用。奶粉為無糖的嬰兒配方奶粉。

2. 蛋清在無水、無油清潔的容器中打發,當魚眼泡時加入細砂糖,打發至硬性發泡。很硬那種,拉出攪頭很短的尖那種。

3. 將優格糊與蛋白糊混合翻拌後,不需要過度攪拌,快手操作,提前預熱烤箱,我用100度左右就可以,記得鋪上矽膠墊哦!強烈推薦,以前我用烤紙,這幾次用的矽膠墊超級給力,裝入裱花袋中可用圓嘴或者我這種中號六齒擠出小饅頭或者小塔糖的形狀!

4.因為給寶寶吃就不要擠很大,小小顆很適合寶寶,所以就這個量,你可能也會擠兩盤以上,我是兩盤一起烤的,低溫烘烤用了60分鐘,中間有上下倒換一下烤盤,原則是不上色好看!

5.最後也可關閉烤箱,不拿出烤盤在裡面悶烤一下,當你的溶豆不容易從烘培紙上取下的時候,就是沒有烘烤透,需要延長時間。烤好後要密封儲存!此款小食不會很甜,很適合寶寶,入口即溶!

*小貼士*

1. 請根據自家烤箱溫度做調整,我的烤箱比較大,小烤箱的火力比較猛。要看著一下,以免糊掉。

2.不成形請根據以下兩點找原因:要么酸奶太稀,水分太多,要么攪拌過度消泡了!

3.從烤紙上取不下來要么烘焙時間不夠,還是軟的,要么烤過了,已經糊了!


video of making yogurt melts

Plain Yogurt Melts
Ingredients
30g Natural Greek Yogurt (or using flavoured yogurt)
25g milk powder / baby formula milk powder
12g corn starch
50g egg white
10g castor sugar (I used 7g only)
1/2 tsp lemon juice or vinegar

Steps:
1) sieve milk powder and corn starch into the yogurt
2) add the lemon juice into egg white, beat the egg white with sugar till hard peak form
3) add 1/3 of the egg white into the yogurt mixture, mix well
4) add the yogurt mixture into the 2/3 of the egg white and fold well gently but quickly.
5) preheat oven at 120'C
6) put the mixture in a piping bag or plastic bag, cut a 0.7cm hole at the edge
7) Squeeze out mixture onto baking tray laid with non stick parchment paper
8) Bake at 100'C for 60mins or till the cookies easily be removed from the parchment paper
9) let the cookies sit in the oven for further 5-10mins is recommended.

Tuesday, September 15, 2015

15/9/2015 Tuesday 優格酸奶溶豆

Happy Tuesday and Happy Holiday for mummies in Malaysia as school is closed today and tomorrow is public holiday.

Breakfast: Capsicum omelette, kiwi and fresh milk

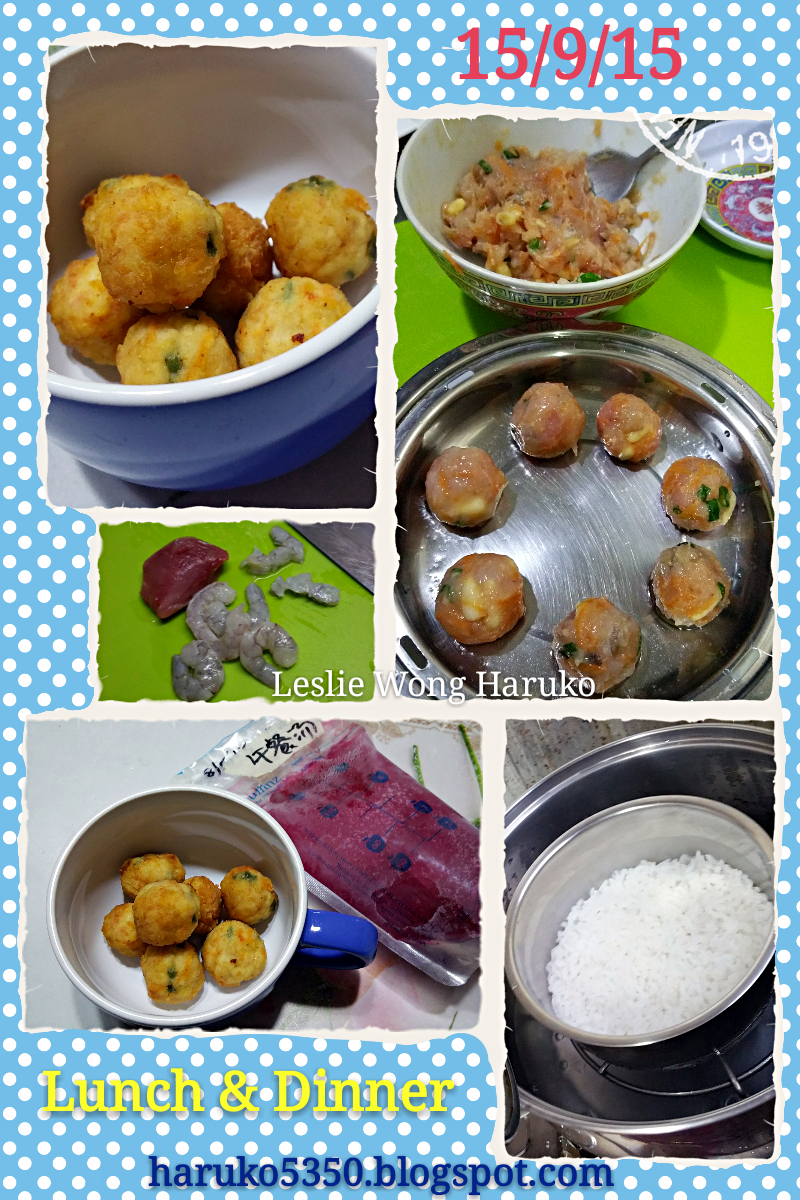
Lunch and Dinner: White rice, prawn meat ball (fried and steam 2 styles) and beetroot soup

Teatime: Yogurt Melts and honey lemon 


Capsicum Omelette
Ingredients:
1/4 green capsicum
1 brown button mushroom
some spring onion
1 egg (lightly beaten)
dash of pepper and rice size salt to taste

Steps:
1) cut capsicum into short slices
2) cut mushroom into slices  and dice the spring onion
3) heat pan, add some rice bran oil, pour in the capsicum, mushroom and spring onion
4) stir fry for a while and add in egg
5) add in pepper and salt, pan fry till both sides cooked


Prawn Meat Balls (Pan fry/steam)
Ingredients:
40g pork tenderloin
4-5 medium size prawns
some spring onion
1" carrot
2 tbsp pine nuts
dash of pepper and salt to taste
few drops liquid amino

some corn flour for coating if pan frying the meat balls

Steps:
1) chop meat and prawn till minced
2) place the minced meat in a bowl, add in spring onion, shredded carrot, pepper, salt, liquid amino and pine nuts,mix well.
3) use 1 tsp spoon to scoop the mixture, roll into balls ( damn your hands for easier handling)
4a) place the balls on a plate (if steaming is preferred), steam for 10 mins in medium heat. 
4b) coat each ball with some corn flour, pan fry or deep fry till golden brown


【鮮蝦蔬菜肉丸子】
材料:
40克 梅肉
4-5只中型鮮蝦
一點蔥花
一段胡蘿蔔
2 湯匙 松仁
適量 胡椒粉
適量 海鹽

一些玉米粉 (如果是煎法)

1.用刀把豬梅肉和鮮蝦剁成肉泥。
2. 把肉泥放進一個碗裡,加入刨成絲的胡蘿蔔,蔥花,胡椒粉,鹽和松仁, 一起攪拌均勻。
3.用小茶匙輔助舀起肉漿在手心揉成圓球狀。
4a. 煎:把每粒肉丸沾上少許玉米粉,用小火兩面煎到熟透即可。
4b. 蒸:把每粒肉丸一一擺進蒸盤裡,中火蒸10分鐘。


優格酸奶溶豆製作視頻

優格酸奶溶豆
材料:
原味優格 30克
嬰兒奶粉 25克 (如果没有,全脂奶粉/玉米粉代替)
玉米澱粉 12克
蛋清 50g
細砂糖 10克 (我加7克而已)
檸檬汁 幾滴(加蛋白中去腥和稳定蛋白泡泡)

做法:
  
1. 稱出適量優格 ,把奶粉與玉米澱粉過篩後與優格攪拌均勻後備用。奶粉為無糖的嬰兒配方奶粉。

2. 蛋清在無水、無油清潔的容器中打發,當魚眼泡時加入細砂糖,打發至硬性發泡。很硬那種,拉出攪頭很短的尖那種。

3. 將優格糊與蛋白糊混合翻拌後,不需要過度攪拌,快手操作,提前預熱烤箱,我用100度左右就可以,記得鋪上矽膠墊哦!強烈推薦,以前我用烤紙,這幾次用的矽膠墊超級給力,裝入裱花袋中可用圓嘴或者我這種中號六齒擠出小饅頭或者小塔糖的形狀!

4.因為給寶寶吃就不要擠很大,小小顆很適合寶寶,所以就這個量,你可能也會擠兩盤以上,我是兩盤一起烤的,低溫烘烤用了60分鐘,中間有上下倒換一下烤盤,原則是不上色好看!

5.最後也可關閉烤箱,不拿出烤盤在裡面悶烤一下,當你的溶豆不容易從烘培紙上取下的時候,就是沒有烘烤透,需要延長時間。烤好後要密封儲存!此款小食不會很甜,很適合寶寶,入口即溶!

*小貼士*

1. 請根據自家烤箱溫度做調整,我的烤箱比較大,小烤箱的火力比較猛。要看著一下,以免糊掉。

2.不成形請根據以下兩點找原因:要么酸奶太稀,水分太多,要么攪拌過度消泡了!

3.從烤紙上取不下來要么烘焙時間不夠,還是軟的,要么烤過了,已經糊了!


Plain Yogurt Melts
Ingredients
30g Natural Greek Yogurt (or using flavoured yogurt)
25g milk powder / baby formula milk powder
12g corn starch
50g egg white
10g castor sugar (I used 7g only)
1/2 tsp lemon juice or vinegar

Steps:
1) sieve milk powder and corn starch into the yogurt

2) add the lemon juice into egg white, beat the egg white with sugar till hard peak form

3) add 1/3 of the egg white into the yogurt mixture, mix well

4) add the yogurt mixture into the 2/3 of the egg white and fold well gently but quickly.

5) preheat oven at 120'C

6) put the mixture in a piping bag or plastic bag, cut a 0.7cm hole at the edge

7) Squeeze out mixture onto baking tray laid with non stick parchment paper

8) Bake at 100'C for 60mins or till the cookies easily be removed from the parchment paper

9) let the cookies sit in the oven for further 5-10mins is recommended.